|
<< Click to Display Table of Contents > Pen Settings |
  
|
|
<< Click to Display Table of Contents > Pen Settings |
|
Each entity is assigned to a pen. This is by default pen 1. To be visualized on the screen each pen can have a different color. Where to set the color, see in chapter View. The mark property page seen below can be used to assign a pen to the selected entity. The parameters are different for YAG and CO2 lasers.
YAG laser:
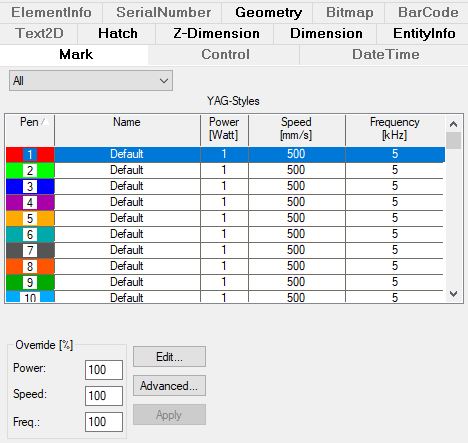
Figure 103: Mark property page with Pen Settings for YAG Laser |
Pen: pens are listed by number Name: Name of the pen Speed: Galvo mark speed in mm/s. Power: Laser Power in Watt. For calibration see chapter Power Map. Power2: Laser Power2 in Watt. For calibration see chapter Power Map. Only available if a second laserport LP2 has been defined within the sc_setup.exe. Frequency: Frequency in kHz. The grid is sortable through clicks on the respective column. Override [%]: The override factors can be used to increase or decrease all values for all pens during mark process. The pen itself will not be changed. Edit...: Press the edit button to define the settings of the currently selected pen. Alternatively, double-click on any field in the line of the selected pen (blue in Fig. 103). Advanced...: Within the advanced dialog settings for the Power Map, the HomeJumpStyle and the System PixelMap can be done. Apply: Applies the selected pen to the current selected object. |
|---|
Figure 104: Mark property page with Pen Settings for CO2 Laser |
Only the specific parameters are explained below, the others can be looked up above at YAG. Second power has to be enabled in sc_setup.exe → Hardware Settings → Enable CO2 Power2. Power1: LaserPower1 signal in percentage of period. Power2: LaserPower2 signal in percentage of period.
|
|---|
|
Pen 255 is used for the red pointer. In this pen, any defined power will be disabled with the use of the red pointer. Pen 256 is used for the home jump. When the scanner moves to the home position (usually after executing) pen 256 is used. For example this feature can be used to switch off the lamp current after marking. See power control of pen. Pen 256 can be edited by clicking Advanced... → HomeJumpStyle (Pen #256). |
|---|
|
In general, the Pen Settings are saved in <SCAPS>\system\sc_light_settings.sam if Save Pens On Exit is enabled or "Save Pens Now" is used. It is highly recommended to backup sc_light_settings.sam every time after having done any important or time consuming configuration of the Pen Settings. |
|---|
There are several possibilities to save and load the pen settings:
Save pens into SAMLight settings file (*.sam) |
Load pens from SAMLight settings file (*.sam) |
|---|---|
•Save pens on SAMLight exit. Define in Settings → System → General → Files → Save Pens on exit if the pens should be saved when closing SAMLight. •Save pens directly via Settings → System → General → Files → Save Pens Now. |
•Load pens on SAMLight start. •Load pens on File → New. Define in Settings → System → General → Files → load pens on file new if the current pens should be reverted. |
Save pens into SAMLight job file (*.sjf) |
Load pens from SAMLight job file (*.sjf) |
•Save a job directly via File → Save (as). Define in Settings → System → General → Job Save/Load Dialog the default state of the Pens checkbox. •Save a job via save job after each mark if the current job already contains the pen settings. •Save a job via auto save on exit if the current job already contains the pen settings. |
•Load a job directly via File → Load. Define in Settings → System → General → Job Save/Load Dialog the default state of the Pens checkbox. •Load a job via File → RecentJobs. Define in Settings → System → General → Recent Jobs → Load pens if the job pens should be loaded as well. •Load a job via Job Auto Load. Define in Settings → System → General → Job Auto Load → Load pens if the job pens should be loaded as well. |
Table 13: Different possibilities to save and load pens
Apply pens to hatches, LineArrays or PolyLines:
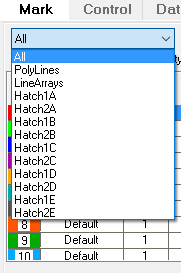
Figure 105: Drop-down menu to apply a pen for hatches, LineArrays and PolyLines |
For selected entities a pen can be applied to each of 10 available hatches, LineArrays and PolyLines. The currently applied pen for an entry of the drop-down menu will be highlighted when selected. To reset this settings select 'All' and apply a pen. For complex configurations we recommend the styles feature. |
|---|