|
<< Click to Display Table of Contents > Main Settings |
  
|
|
<< Click to Display Table of Contents > Main Settings |
|
The following page can be found under Mark → Edit... → Main.
The dialog looks different depending on the set laser mode:
•YAG
•CO2
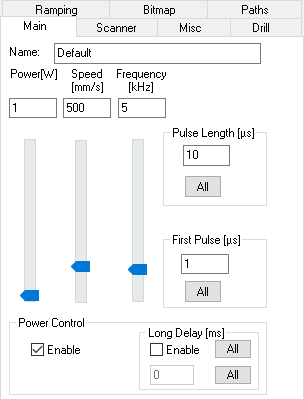
For YAG lasers, the following dialog appears:
Figure 103: Main Pen Settings for YAG Laser |
Power: Power of the laser for the selected pen. To redefine the power, Power Control has to be enabled. Power2: Power2 of the laser for the selected pen. To redefine the power, Power2 Control has to be enabled. Only available if a second laser port LP2 has been defined within the sc_setup.exe. Speed: Marking speed of the selected pen. Min and max values are defined in the optic settings. Frequency: Q-Switch frequency of the laser pulses. Min and max values are defined in the optic settings. Pulse Length: Q-Switch length in µs. If pulse length ≥ 1/frequency, a red notice 'cw' will appear to indicate continuous mode. First Pulse: First pulse killer length in µs. Min and max values are defined in the optic settings. Power Control: Enable or disable laser power slider and power control for this style. Long Delay: If enabled and the power is changing, the system will wait the indicated period before it will continue. |
|---|
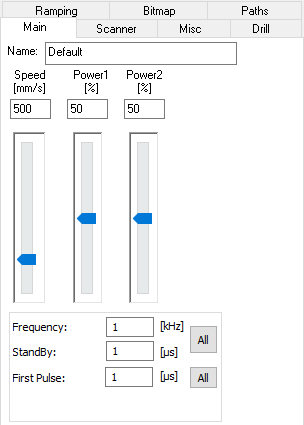
CO2 laser Pen → Main settings:
Figure 104: Main Pen Settings for CO2 Laser |
Speed: Marking speed of selected pen. Power1: Pulse length of laser signal 1 in %. Frequency: Frequency of the laser pulses. Stand-by: Stand-by pulse length in µs for stand-by mode (for both signals equal). The stand-by mode can globally be set in optic settings for scanner card. First Pulse: Set the length of the first pulse killer. Laser_B as FPK has to be enabled in sc_setup.exe → Driver Settings before and Show CO2 Power2 has to be disabled in sc_Setup.exe → Hardware Settings → Settings All: Pressing this button applies Frequency and Stand-by to all pens. |
|---|