|
<< Click to Display Table of Contents > USC-Server |
  
|
|
<< Click to Display Table of Contents > USC-Server |
|
Now that you have the SAMLight software installed, you are ready to connect your device.
Please connect your USC-card via USB and turn on the power supply. If an additional USB-Dongle was delivered, please connect it as well.
Open the sc_usc_server.exe. It is located here: C:\scaps\sam2d\system\sc_usc_server.exe
Typically the USC-Server runs in the background and is not visible for the user. If you want to open it in visible mode you have to open it twice.
The USC-Server can also run in visible mode by default. See the setting for this here.
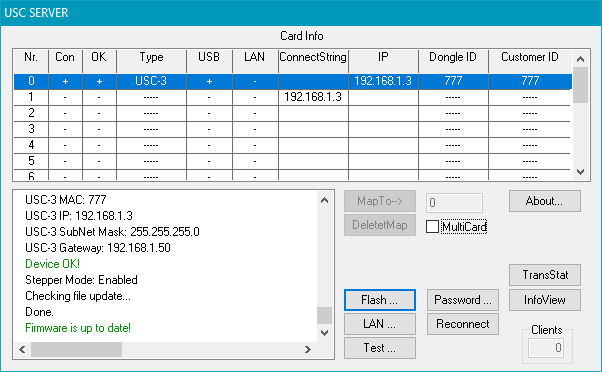
Figure 10: USC-Server Main View
After you powered up your USC-card and connected it via USB it will be displayed here.
Check for a Firmware Update (USC-2/-3/-4):
In the left bottom corner you can see the server log. Please make sure that the Firmware of the USC-card matches with the SAMLight version (USC-2/-3/-4).
If the Firmware is not up to date click Flash ... → UpdateSystem. The USC-2 needs a manual restart after the update, the USC-3 and USC-4 reboot automatically.
Afterwards you can enable the LAN connection to your board (USC-2/-3):
Important: Please make sure that your network settings are correctly configured at your PC.
USC-2: Default IP-address 192.168.1.2
USC-3: Default IP-address 192.168.1.3
USC-4: Default IP-address 192.168.1.4
Now click on LAN...
Here you can change the IP-Address of your USC-card.
You can additionally set the Connect String so that the USC-Server knows the IP-Address it should search for.
If you lost you IP-Address, you can disconnect JP2 (same for USC-2/-3/-4) to find the card again via the default IP-Address after reboot.
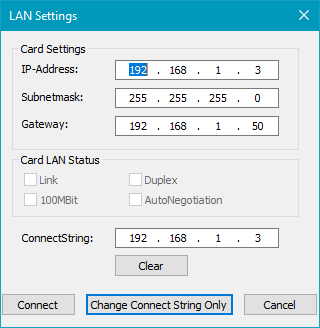
Figure 11: USC-Server LAN Settings
The next step is to open the sc_setup.exe in order to configure the software settings regarding the laser.