|
<< Click to Display Table of Contents > Marking |
  
|
|
<< Click to Display Table of Contents > Marking |
|
By clicking on the mark icon ![]() or by selecting Menu bar → Mark → Start the mark dialog is opened:
or by selecting Menu bar → Mark → Start the mark dialog is opened:
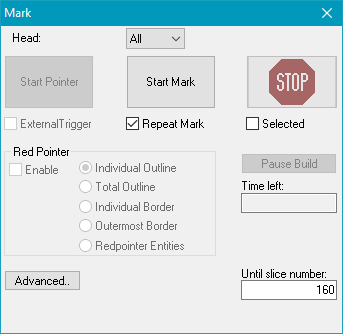
Figure 534: 3D Mark Dialog
Each time a marking operation is triggered (by clicking Start Mark or by an external trigger), all objects to be marked are sent to the scanner control card and marked.
Head: Only editable with the license MultiHead. Choose one or all of the available heads for the marking operation.
Start Pointer: Starts the red pointer. This button is active only if the red pointer is enabled. For the red pointer pen #255 is used (see chapter Mark Settings).
Start Mark: Starts the marking process. The first slice which will be marked is the number of the currently selected slice.
Stop: Stops the mark process.
Red Pointer: See chapter Red pointer.
Individual Outline: If checked each individual outline of the objects is drawn.
Total Outline: If checked the complete outline of all objects will be drawn by the red pointer, otherwise only the outline of one object will be drawn.
Individual Border: If checked, the red pointer draws the real geometry of the object.
Outermost Border: If checked, the red pointer draws the outermost individual borders of objects.
Red pointer Entities: If checked, only red pointer entity checked object(s) will be drawn. An object can be checked as red pointer entity in the entity list window.
|
Red Pointer cannot be used for sub-Entities when "mark selected" is active! |
|---|
External Trigger: If checked the mark process can be started by an external trigger signal received by the optic device.
Repeat Mark: If checked, all slices (layers) will be marked one after another. If not checked only the currently selected slice will be marked.
Selected: If checked only the selected ScLayerSolid entities will be build.
Execution State:
Finished Layers: Shows all finished layers
Total Layers: Shows total layers
3D:
Until slice number: The marking will stop, if this slice number has been reached.
Time left: Shows estimated time until slice number is reached
Pause Build: The running build process will be paused after the current slice has been marked completely. If a slice post-process has been defined, it will be executed before pausing. If you click the button again during a paused build process, the next layer will be marked.
Advanced: The following dialog opens after clicking on the Advanced button.
Selecting Edit -> show selected Layer in the Menu bar shows the preview of which layer will be marked.
