|
<< Click to Display Table of Contents > Mark Dialog |
  
|
|
<< Click to Display Table of Contents > Mark Dialog |
|
To open the Mark Dialog go to Menu bar → Mark → Start.
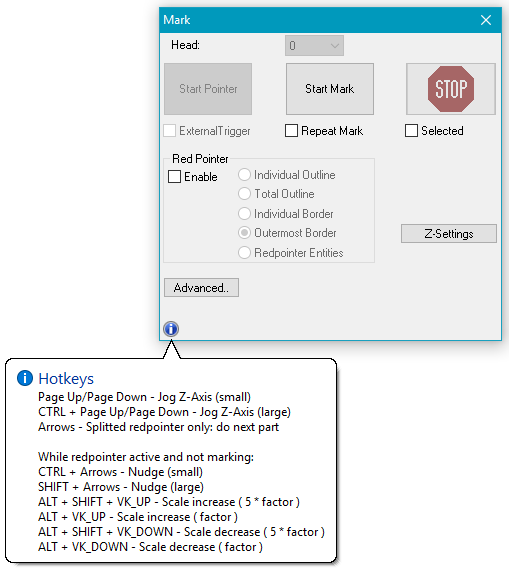
Figure 394: Mark Dialog
Each time a marking operation is triggered (by clicking Start Mark or by an external trigger), all objects to be marked are sent to the scanner control card and marked.
Head: Only editable with the license MultiHead. Choose one or all of the available heads for the marking operation.
Start Pointer: Starts the red pointer. This button is active only if the red pointer is enabled. For the red pointer pen #255 is used (see chapter Mark Settings). While the red pointer is outlining, scale and nudge can be done with the hotkeys listed below.
Start Mark: Starts the mark process.
Stop: Stops the mark process.
Red Pointer: See chapter Red pointer.
Individual Outline: If checked each individual outline of the objects is drawn.
Total Outline: If checked the complete outline of all objects will be drawn by the red pointer, otherwise only the outline of one object will be drawn.
Individual Border: If checked, the red pointer draws the real geometry of the object.
Outermost Border: If checked, the red pointer draws the outermost individual borders of objects.
Red pointer Entities: If checked, only red pointer entity checked object(s) will be drawn. An object can be checked as red pointer entity in the entity list window.
|
Red Pointer cannot be used for sub-Entities when "mark selected" is active! |
|---|
External Trigger: If checked the mark process can be started by an external trigger signal received by the optic device. If MOTF is enabled, this checkbox is not available (due to software jitter). Please use Mark - Trigger instead.
Repeat Mark: If checked the mark process will be repeated.
Selected: If checked only selected entities are considered in the mark process. This option is not available for Splitting.
Execution Time:
Current: Shows current marking duration
Expected: Shows the estimated marking duration
Advanced: The following dialog opens after clicking on the Advanced button.
Z-Settings: See chapter Deep Engraving.
Hotkeys: Some extra functionality to jog the z-axis or to nudge or scale entities. Controlling the Jog Z-Axis via (CTRL +) Page Up/ Page Down is only available for motion controller type 14.
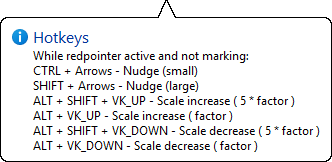
Figure 395: Hotkeys
|
Nudge Step and Scale Factor can be defined within Settings → System → View. The StopKey in Settings → System → Short Keys should be set to ESC/Space. |
|---|
|
If you use short keys for motion control make sure, that you do not use the hot keys. If short keys are assigned hot keys, they are overwritten in the mark dialog. |
|---|

