|
<< Click to Display Table of Contents > Serial Number |
  
|
|
<< Click to Display Table of Contents > Serial Number |
|
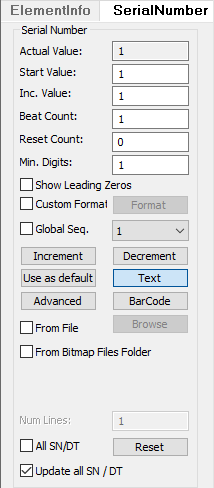
Generate a Serial Number object by clicking the ![]() button in the toolbar. Then move the mouse to the desired position and press the left mouse button. The serial number property page appears:
button in the toolbar. Then move the mouse to the desired position and press the left mouse button. The serial number property page appears:
Figure 245: SerialNumber page |
Actual Value: Shows the actual value. Can not be edited. It is calculated by: ActualValue = StartValue + IncrementValue * RoundDown(( SequenceNumber Modulo ResetCount ) / BeatCount ) Start Value: Value to start with. Content value can also be set as HEX character. Inc. Value: Increment step after each beat. Beat Count: After number of markings is equal to the beat count the serial number will be incremented. (Even valid if Mark → Selected is used.) Reset Count: After reset count exposures the serial number will be reset. That means it is set to the start value. Min. Digits: Minimum number of displayed digits. Show Leading Zeros: If activated leading zeros are displayed. Custom Format: If activated an encoded format for serial number can be defined when pressing the Format button. Format: If the button Text is selected this switches to the Text property sheet. The format of the text can be defined here. If the button BarCode is selected this switches to the BarCode property sheet. Global Seq.: Global Sequences are serial numbers which go across all jobs. So it is possible to use the same serial number in different jobs. Setting of a global reset time is available in Settings → System → General. Increment: Manually increments the selected serial number. Decrement: Manually decrements the selected serial number. Text: The serial number will be displayed as text. BarCode: The serial number will be displayed as barcode. Automatisation in flash mode only works for a barcode created as a serial number via this option. Use as default: Uses the properties of the currently selected serial number object for the generation of new serial numbers. The program saves these settings also for a new program start in case save settings on exit is checked in the general settings. Advanced: Opens the Serialnumber and Date Time dialog. From File: When activated, you can use a text or excel file to readout strings for serialization by clicking on the Browse button. See also: Automate Serialization. From Bitmap File Folder: When activated, you can select a folder with the Browse button. In this folder you can place bitmap files for automatized import. Instead of a serial number, the number of the bitmap file is increased (naming convention is 0001_name.file). The files need to have the same size and resolution, all importable file types are possible. See also: Automate Serialization. All SN/DT: If enabled, the reset button updates all date time objects and resets all serial numbers in the job. If disabled, only the selected serial number will be reset with click on the reset button. Reset: Sets the selected serial number to the start value. Update all SN / DT: This checkbox is global and updates all serial numbers and date time objects in the job. If disabled, serial numbers will not be incremented, date time objects will not be updated. |
|---|