|
<< Click to Display Table of Contents > Step / Repeat |
  
|
|
<< Click to Display Table of Contents > Step / Repeat |
|
The step and repeat marking offers the possibility to repeat the same job for a defined number of times with some specific movements between every marking step. That is useful e.g. in cases when the job has to be marked at different positions on a working piece or to different working pieces that are located on the same working area. The movement can be:
•a rotation of the working piece performed by an external drive
•a planar movement of the working piece performed by external drives
•a planar movement performed by the translation of the current job while the working piece stays on its position
To use this feature following steps are necessary:
•configuration and enabling of the external motion control to perform the automatic movement of the object that has to be marked in case an external drive has to be used
•definition of the total number of repeats that have to be done for the same job during one marking cycle
•definition of the speed the motion controller has to drive the external hardware with between two marking steps in case an external drive is used
•selection of a Step/Repeat mode (Angular or Planar mode) and configuration of its specific settings
Configuring the Motion Control has to be done at Menu bar → Settings → System → Extras. Here in the field Motion Control the checkbox Active has to be selected. Additionally the motion control configuration file for the used controller has to be configured. Depending on the Step/Repeat mode that has to be used, the motion controller needs to be set up for angular or planar movements. The configuration dialog will only offer these modes and axes for configuration that are enabled using the correct Motion Control mode. If the motion controller was configured in a way that no axes are available for rotating or that the wrong axes (not X and Y) are configured for moving, there will be no configuration possibilities available in the Step/Repeat settings dialog beside the planar mode that translates the whole job to simulate some kind of movement. The following dialog can be opened via Menu bar → Extras → Step / Repeat → Settings.
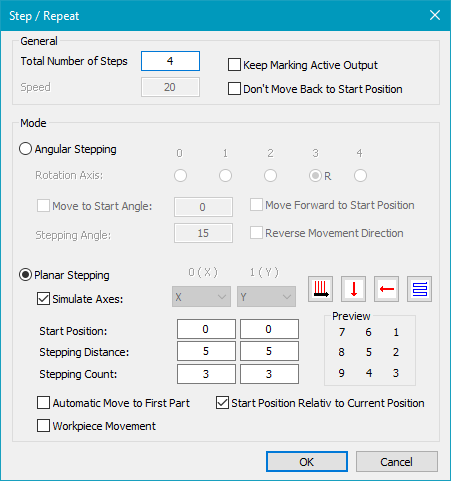
Figure 156: Step / Repeat Dialog
General: At the top of the dialog window the common settings that are valid for all Step/Repeat modes can be made. The total number of steps and the motion speed can be defined here.
Keep Marking Active Output: In normal operation mode the digital_output_0 is set to 1 every time a split is marked and it is set back to 0 during the movement operation. This behavior can be changed by enabling the checkbox Keep Marking Active Output. If it is active then the marking signal via digital_output_0 would stay at 1 as long as the complete job including all splits is marked.
Workpiece Movement: If the scan head is not moving but the workpiece is moving instead, then all relative movements have to be inverted.
Mode:
Angular Stepping: The angular mode has to be used for environments where the working pieces can be moved by performing a rotation. Here the following has to be defined:
•which axis has to be used for rotating (X, Y or Z)
•the starting angle (Move to Start Angle) and where it has to be moved back after performing a full marking Cycle
•the angle the working piece has to be moved during a step (Stepping Angle)
Move to Start Angle: This checkbox allows you to enable or disable the movement to the starting angle.
Forward to Start Position: Here you can force a movement that completes a full rotation instead of going back to the origin.
Planar Stepping: The lower part of the configuration window has to be used for setting up the planar "step and repeat" operation. Here movements within one level and in two directions X and Y can be defined. Accordingly the motion controller needs to be configured in a way that the two axes X and Y are available for planar movements. Else this option can work in movement simulation mode only when the complete job is translated instead. This option can be enabled by setting the checkbox Simulate Axes. In this case no start position can be used. Here it is defined by the current position of the jobs entities within the working area.
For both axes the following values can be set:
Start Position: The starting position to which the motion controller moves to at the beginning of a full Step/Repeat marking cycle
Stepping Distance: The distance the axes have to be moved in a defined direction for every repeated marking
Stepping Count: The stepping count defines how often the job is marked.
Additionally there are four buttons that define the order and direction of the movements that are performed after every mark. Here the following things can be defined:
•the main stepping direction (mark rows or columns first)
•the direction for the Y axis (move in positive or negative direction using the defined distance)
•the direction for the X axis (move in positive or negative direction using the defined distance)
•the movement type (unidirectional or bidirectional)
According to the direction and movement types that are selected here the preview below of these buttons shows the order and positions of the marks like they will be executed.
Other like it is known from the rotary mode here no option exists that allows it to force a movement back to the starting position. Instead of this it is possible to use the option "Move Forward and Back" that performs a special optimized movement. Here the first one goes forward and works exactly like defined by the movement direction buttons but after finishing it, it stays at the reached position. The next movement is reverse to the one defined by the buttons so that it goes back to the starting position.
Automatic move to first part: If the center of the field is at the same position as the entity that has to be marked, this option enables the software to find the starting point automatically.
Start position relative to current position: For moving workpieces on a conveyor or by a motor this option sets the starting position of the following split relative to the actual position.
Don't move back to start position: If this option is unchecked, the scan head moves back to the defined starting angle or position, after the last marking cycle has been done.
Enable Step/Repeat: When all settings are made conform to the used working environment the Step/Repeat marking mode has to be enabled by using Menu bar → Extras → Step/Repeat → Enable Mode. Now starting a marking operation no longer results in one single marking cycle. Instead the marking is repeated until the configured number of steps is reached.