|
<< Click to Display Table of Contents > Bitmap Marking |
  
|
|
<< Click to Display Table of Contents > Bitmap Marking |
|
Bitmap Marking (or Bitmap Rotary) allows you to mark bitmaps on rings continuously without the need to split the bitmap in parts manually. Comparing to the standard splitting functionality this one:
•requires a connected motor, which is controlled via step and direction signals. SAMLight motion type must be "Type 8 - Generic stepper controller" or "Type 14 - USC-2 stepper controller".
•requires a bitmap, which is not rotated in SAMLight
•modifies the bitmap automatically to fit to the resolution of the drive and the desired bitmap marking parameters; here the dither step value is an important parameter
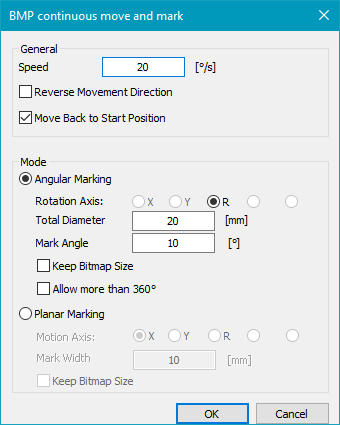
Figure 157: Bitmap Marking Dialog
The following steps are necessary to mark a bitmap along one of its axes:
1.The motion driver has to be configured for rotary or planar marking mode
2.A bitmap has to be imported. Its scanner bitmap has to be created and configured according to the desired results. If the option "Scan XDir" is set for that bitmap the bitmap splitting functionality will recognize this automatically and will perform all checks and calculations using the correct bitmap direction.
3.The Continuous Bitmap Marking setup dialog that can be found in submenu "Settings" has to be called to set up the rotation or motion axis, the diameter of the ring, the marking angle for angular marking as well as the rotation direction and the mark width or planar marking.
4.The Continuous Bitmap Marking feature has to be enabled for the next marking process by Menu bar → Extras → Bitmap Marking → Enable Mode.
General:
Speed: The speed the connected drive has to be moved in between two lines of the bitmap
Reverse Movement Direction: Reverses the direction the drive moves e.g. to mark the inner part of a ring
Mode:
Angular Marking:
Rotation Axis: Selects the axis of the drive that has to be used for the movement. This option is important when there are more than one angular axes configured for a motion drive, but it does not influence the splitting direction of the bitmap. If there is no angular axis configured the complete angular marking mode is not available.
Total Diameter: The diameter of the ring that has to be marked. This value is used to check if the laser is able to create a result without gaps. Is the dither step of the bitmap much smaller than the drives resolution the operation would fail.
Mark Angle: Specifies which part of the ring has to be marked with the bitmap. Depending on this value the size of the bitmap is modified to fit. In case the option Keep Bitmap Size is not chosen.
Keep Bitmap Size: If that option is set the bitmap is not scaled in order to get a size that results in the specified marking angle, here the source bitmap is left untouched.
Planar Marking:
Motion Axis: Selects the axis of the drive that has to be used for the movement. If there is no planar axis configured the complete planar marking mode is not available.
Mark Width: Indicates the width of the marking.
Keep Bitmap Size: If that option is set the bitmap is not scaled in order to get the size that is specified by the mark width, here the source bitmap is left untouched.