|
<< Click to Display Table of Contents > Entity List |
  
|
|
<< Click to Display Table of Contents > Entity List |
|
The Entity List shows all the entities in the current job and visualizes their logical structure/hierarchy in a ListView. It provides operations for moving, copying and sorting entities as well as exploring entities that contain sub-entities.
Definition entity: An entity is either an element or a container or a group of entities. An element keeps real geometric data like lines, points and pixels and a so-called container contains elements.
Example: For example a simple description of a desk: The desk is a group of the sub-entities legs and desk_top, where the desk_top is a container that contains the geometry of the desk top. The group legs contains the sub-entities leg1,...,leg4 which are containers that contain the geometry of a leg.
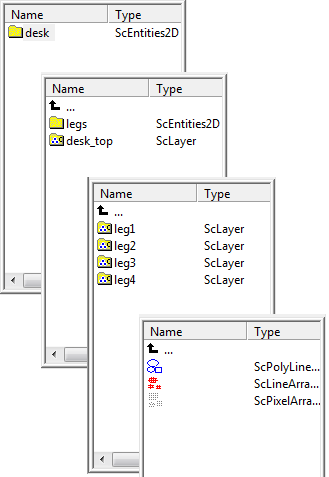
Figure 182: Entity List
The last picture shows the elements of the container leg1.
The levels of the Entity List: To understand the levels think again of the desk example above. The entity desk is on level 1 and its contents are on level 2. The entity legs is a sub-entity of desk (level 2), its contents are on level 3 and so on. For a detailed description of the object hierarchy see chapter Object Hierarchy.
Exploring: By double clicking an entity which contains other entities (for example a Group) the ListView will step inside and show the entities inside the selected one.
Move: This is the standard operation of a drag and drop process: It moves the selected entity or entities. Here following possibilities are available:
•Move an entity within the job to change its position
•Move a grouped entity out of the group by dragging it onto the level up arrow
•Move an entity into an existing group by dragging it onto the target ScEntities2D while the Shift key is hold down
•Move an entity/ entities in an group by options to previous, to next, to top and to bottom.
Copy: This works in the same way as Move, pressing the CONTROL-key additionally during the drag and drop process puts a copy of the selected entity in the drop folder.
Remark to Move/Copy: Not every move or copy operation is allowed. So, for example the move of a line array into a PolyLines group or the move of a element inside a container out to an other container can not be executed since this would corrupt the data consistency.
Group: Several entities of the same level can be grouped by clicking on them while holding the Shift key down and choosing Group from menu Edit → Group. This procedure will create a new group on the actual level that gets the selected entities as sub-entities.
The following operations are provided by pressing the right mouse button. Here the entity list context menu appears that offers the following functionalities:
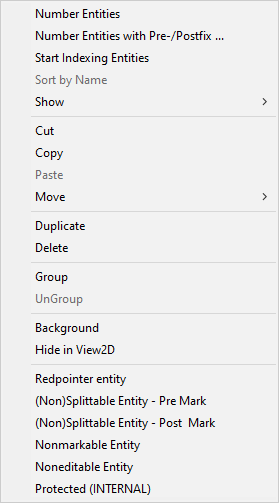
Figure 183: Entity List Context Menu
Number Entities: All Entities, regardless if they are selected or not, are being named with a number starting from 1.
Number Entities with pre-/postfix: Opens the corresponding dialog. All Entities are being named starting from a freely selectable number with a freely selectable incremental value and / or a defined pre or postfix.
Start / Stop Indexing Entities: Opens the corresponding dialog If selecting this the first time all Entity Names are being deleted. Now the user can choose between indexing options. If this is done the user may index any entity by clicking on it with the left mouse button. By default the indexing starts with 1 and is incremented by 1 after each mouse click. If the user wishes to return to normal mode again, he selects Stop Indexing Entities.
Sort By Name: Selecting this function sorts the entities on the actual level by their name. The name comparison is case sensitive and starts at the first letter of the name. Entities with the names 1, 2, 12 will be sorted to 1, 12, 2, because the first letter of entity 12 is 1 and of entity 2 is 2. So the entity 2 gets the position after entity 12. Name the entities with leading zeros to solve that issue.
Remark to changing the order of the entities: The entities of a group will always be marked from the top first to the bottom last in the ListView. So changing the order in the ListView can be used to change the order of exposure during the mark process.
Cut: The currently selected entities are cut out of the list and they are put into the internal entity clipboard for use in further operations.
Copy: Comparing to Cut using this operation the selected entities aren't removed from the entities list but a copy of them is put into the internal entity clipboard too.
Paste: If there are some entities held in the internal clipboard they can be copied into the entity list using the current position.
|
For this operations the same restrictions are valid than described for the Drag-and-drop-copy operation described above. |
|---|
Move: Moves the position of the selected entity or entities in the entity list. The sequence in the entity list determines the sequence of marking.
Group: Groups the selected entities and puts them into an entities group. See also chapter Object Hierarchy.
UnGroup: Ungroups the selected entities group. The view level of all entities inside the group will be decreased by one. See also chapter Object Hierarchy.
Back-/Foreground: This option can be used to use a selected bitmap entity as background object or to use a background object as normal entity. When a bitmap-object is put to the background, it isn't selectable in the View 2D any longer, but only within the object list. Additionally it won't be marked. Such images can be used as a template for creating new objects, here e.g. a technical drawing can be used. After importing a bitmap to the current job it is possible to scale and position it so that the resulting dimensions are correct and that it fits to the desired working area. After that was done it can be put to the Background so that it doesn't influence the current job any longer but can be used as template. If that background drawing isn't required any longer, it can be selected within the Entity List and then put to the Foreground using this menu item again. Now it is possible to remove it from the job. In the list entities that are used as background are marked by a white folder symbol instead of a yellow one.
![]()
Figure 184: Hidden Entity in View2D
Hide-/Show in View2D: Compared to the previously described background option this one works different. When an entity is set to mode "Hide in View2D" it is no longer visible in View 2D but it still can be marked. It can be selected within the Entity List and it can be moved, scaled and translated when it is selected. This function can be used to hide elements in a job that overlap each other. That is useful in cases where some of these overlapping objects can't be seen because the other ones cover them completely. Using that Hide option some of the covering entities can be made invisible without removing them from the marking result. In the entity list entities that are hidden from the View2D are indicated by a dimmed folder symbol instead of a solid yellow one.
Red pointer Entity: When an entity is marked as Red pointer Entity this entity will only show when using the Red Pointer if the checkbox "Red pointer Entity" is activated in the Mark Dialog.
(Non)splittable Entity: When an entity is marked as non-splittable, its appearance within the View2D doesn't change and it is highlighted by red brackets within the Entity List. An entity that is marked in this way will behave differently for split jobs: Independent from their position within the original job, they will be marked before the splits are processed (if set to pre mark) or after the splits are processed (if set to post mark). If an entity state is changed to splittable or non-splittable when the splitting mode is active, that job has to be re-split. That way, this functionality can be used to exclude some parts of the job from being split. These excluded objects will be marked as one piece when a split job is processed. If the splitting mode isn't active this selection doesn't influence the job.
(Non)markable Entity: This can be used to exclude the selected entities from the marking process. By selecting again the selected entities are being included again.
(Non)editable Entity: This can be used to define an entity as non editable. But the entity is still included in the marking process.
