|
<< Click to Display Table of Contents > Hatch |
  
|
|
<< Click to Display Table of Contents > Hatch |
|
This page can be used to generate hatching for entities which have closed PolyLines. Single objects as well as clustered groups can be hatched. A pen for a specific hatch can be selected on the mark property page.
For a Hatch to be actually marked, the according checkboxes 'MarkFlags' have to be enabled in the Pen Settings of the selected Pen (Mark → Edit... → Misc).
Figure 291: Hatch Dialog |
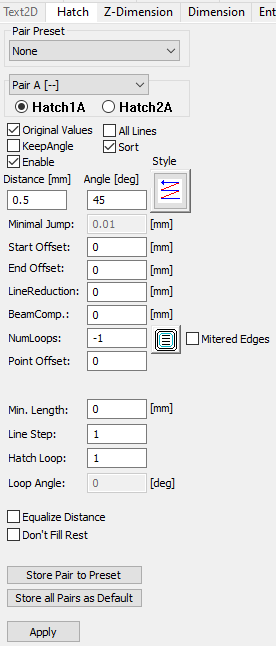
Pair Preset: It can be chosen out of 9 different hatch styles. After choosing the style, the parameters will be added to the entity. This does not behave like an assigned style. Pair A [--]: Access to 5 hatch pairs (A, B, C, D and E) with a total of 10 hatches. "Pair A [--]" indicates that Hatch1A and Hatch2A are disabled ." Pair A [+-]" indicates that the Hatch1A is enabled and Hatch2A is disabled. Hatch1A, Hatch2A: Chose a hatch within a hatch pair. Order of hatching: 1A, 1B, 1C, 1D, 1E, 2A, 2B, 2C, 2D, 2E Original Values: This switch is useful if the entities have been scaled or rotated after hatching and allows to rehatch the entity with the original values. KeepAngle: If checked, the angle is relative to the entities rotation when rehatching the object. So if rotating a hatched entity and rehatching the entity with this flag set, the hatch lines are relative to the entity rotation angle. Enable: If this option is being chosen the current hatch definition is activated. All Lines: If this is not checked, ScPolyLine2D structures are used for calculating hatches. If checked, also ScLineArray2D objects are taken into account. Sort: Changes the order of the hatch lines to decrease the total jump length. It also can flip hatch lines (change the marking direction). Below you can find an example, the marking order of the hatch is 1, 2, 3, 4, 5. If Sort is not enabled the hatch order is simple from bottom to top. At the crossing points the sort can cause problems depending on the material / application. Distance: Distance between two hatch lines in mm. Angle: The angle to the x-axis in degrees. Style: The movement direction can be defined by clicking on the button with the bitmap. The blue lines on the bitmap show the mark lines and their direction. The red lines show the scanner jumps. See Hatch Styles for further information. Minimal Jump: For continuous hatch styles Start Offset: Defines the start distance between the outer line of the object and the first hatch line. The default value is 0 which means that the value entered at "Distance" is taken as Start Offset. End Offset: Defines the end distance between the outer line of the object and the last hatch line. Linereduction: Shortens the hatch lines. Beamcompensation: Shortens the hatching lines so that they do not overlap with the contour. See also the examples below. NumLoops: The number of inner loops can be defined. See the example of blue concentric circles below which was created by a circle with NumLoops. By clicking on the button, the inner loops are activated. Then, you can choose between marking order from outside to inside Negative NumLoops are possible when Improved Beam Compensation is activated. With negative NumLoops, there is an additional option, mitered edges. Mitered Edges: When activated, the outer loops will not be rounded at the corners, as per default, but will repeat the corners instead, or cut them, depending on the angle. Marking from the outside in is beginning next to the contour is this case, and marking from inside to outside is choosing the marking order towards the contour. Point Offset: Only active when NumLoops is enabled. This will make the hatching lines start at different points from the hatch. For example if you have a circle hatched with NumLoops so that you have some concentric circles every circle marking will start at a different angle. Min. Length: If this value is bigger than 0, all hatch lines shorter as this value are not generated. Line Step: On the first pass, the lines are marked. On the next pass, the lines are marked with an offset: . This is repeated until all hatch lines are marked. In this way, the energy input into the material can be distributed more evenly. Example: Line step 3: The marking order of the hatching lines is: 1, 4, 7, 10, .., 2, 5, 8, 11, .., 3, 6, 9, 12, .. Hatch Loop: If the value is bigger than 1, then the hatch is repeated several times with an rotation angle between each repetition. The number of repetitions is defined by the value of Hatch Loop. The corresponding rotation angle in degree can be defined at Loop Angle. Loop Angle: Defines the rotation angle in degree between each repetition of the corresponding Hatch Loop. Equalize Distance: Changes Distance so that Start Offset and End Offset can exactly be set by the hatcher. Don't Fill Rest: If checked only NumLoops gets hatched. The object gets not hatched inside the loops. Store Pair to Preset: This button stores the pair which is actually selected in the drop down menu (A, B, C, D, or E) to the Pair Preset selected in the drop down menu (Hatch style 1, Hatch style 2, ...,or Hatch style 9). Note that the Pair Preset has to be selected first, then the pair can be chosen, can be adjusted, and can be stored. Store all Pairs as Default: The settings of all 5 pairs of the drop down menu (A, B, C, D, or E) are stored directly as default and can be applied to a new entity. Note that the program saves these settings also for a new program start in case save settings on exit is checked in the general settings. Apply: After defining the distance the angle and the style clicking on button Apply will generate the hatch lines. |
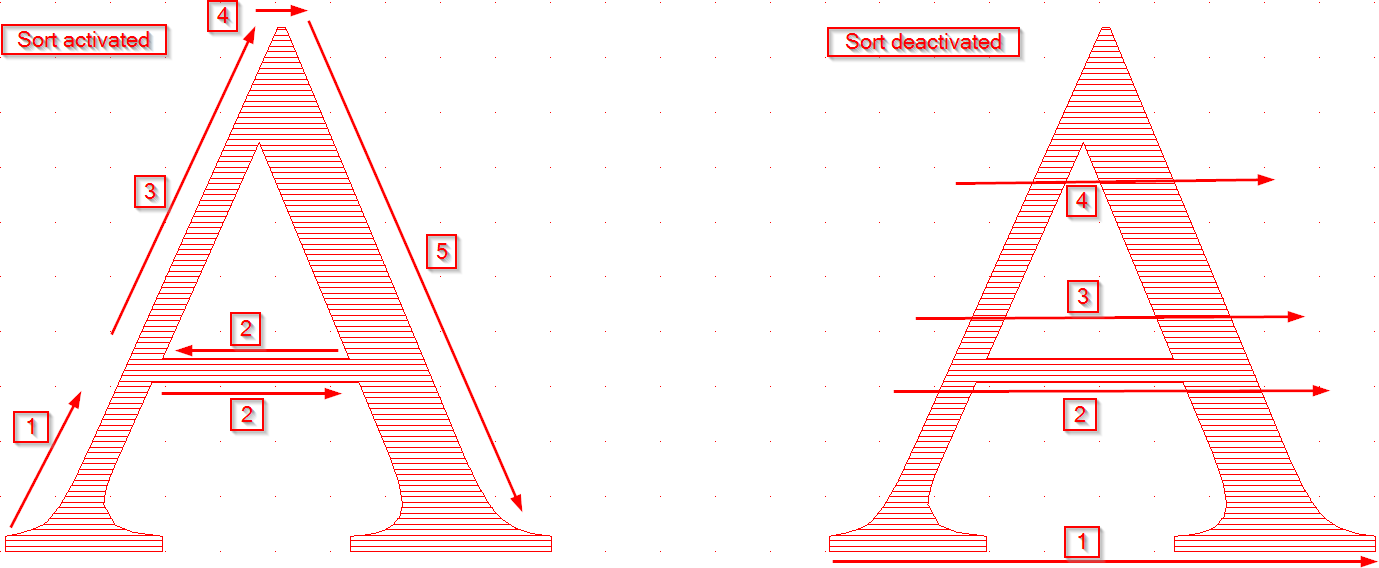
Figure 292: Hatching order with Sort Flag activated (left) and sort flag deactivated (right)
Figure 293: Hatch examples |
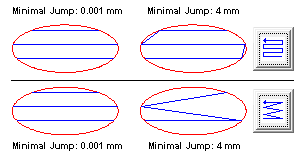
Figure 294: Minimal Jump examples |
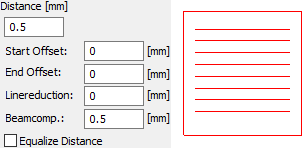
Figure 295: It may happen that hatch gaps appear at the top and at the bottom |
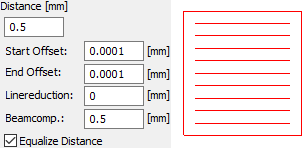
Figure 296: This can be solved by enabling Equalize Distance and using a very small value for Start and End Offset |
|
If several different hatch angles are used it could be helpful to use the following four special hatch angles to avoid potential unwanted hatch patterns: 0.0°, 18.4349°, 45.0° and 71.5651°. |
|---|