|
<< Click to Display Table of Contents > Flash |
  
|
|
<< Click to Display Table of Contents > Flash |
|
With the Flash option the USC-2 and USC-3 cards can be used as stand alone units.
A PC is only required for job setup.
When clicking on Flash... in the sc_usc_server, the following dialog opens:
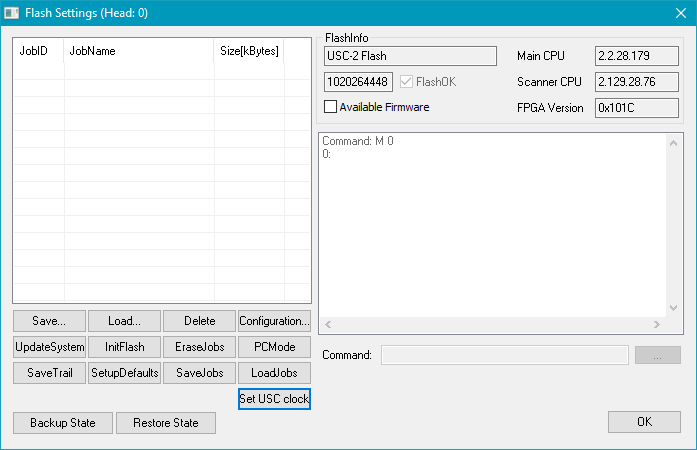
Figure 4: Flash settings
Available buttons are explained in the following:
Save: Opens the dialog to save the selected job from the job list with a desired name at a desired location.
Load: Opens the dialog to load a job into the job list. The new job will be added to the list at the first free slot.
Delete: Deletes the selected job from the flash memory.
Configuration...: Opens the Flash Configuration dialog ( see figure 5 and table 2).
UpdateSystem: Initiates an update of the firmware of the USC card. This is recommended in case of the message "New firmware available" or "Firmware newer than available".
InitFlash: Initializes the complete flash memory. All jobs currently stored on the flash will be deleted and default settings will be restored. Please restart your USC-Card afterwards. Then reselect your old correction file and store the new settings.
EraseJobs: Deletes all jobs from the flash memory.
PCMode: Activates the communication to the USC card via FCI commands (in the "Command" line).
SaveTrail: Saves trail files in <SCAPS>\intermed if the trailing has been activated ( USC-2 , USC-3 ).
SetupDefaults: Clears all customized settings on the card and restores default settings.
SaveJobs: Saves all jobs currently in the job list in a new folder created in <SCAPS>\jobfiles.
LoadJobs: Loads all previously saved jobs onto the card. Those jobs should follow the convention: jobnumber_jobname.unf, for example 2_infinitecircle.unf.
Set USC clock: Synchronizes the timer on the USC card with the time of the PC.
Backup State: Takes the folders cor, config and misc on the USC-3 card and puts them together in a zip folder. Saves this niofs.tar file where the user specifies. This feature is only available for USC-3 cards.
Restore State: Asks where the niofs.tar file with backup states is located, takes it and restores it to the USC-3 card. This feature is only available for USC-3 cards.
The button Configuration... opens the following dialog:
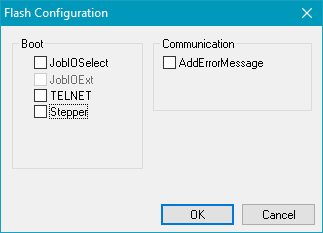
Figure 5: Flash Configuration
Checkbox |
Description |
|---|---|
After booting, the device goes into the Job IO Selection mode. |
|
JobIOExt |
In combination with Job IO Selection mode, this mode enables the inputs [0..7] of the Extension connector, so that 255 Jobs can be selected. (only available with USC-2 and USC-3) |
TELNET |
Activates the TELNET remote control for an USC-2 or an USC-3 card. After the activation the card can be accessed via the TELNET (RJ45) port #23. (only available with USC-2 and USC-3) |
Init |
Leads the FEB-1 to initialize on start up. (only available with FEB-1) |
AddErrorMessage |
Shows Error Message also in readable text in RS-232 and PCMode (not just the error code). |
Table 2: Flash Configuration
|
JobIOExt and TELNET are only available with USC-2 and USC-3. |
|---|
