|
<< Click to Display Table of Contents > Teach / Relocate Reference |
  
|
|
<< Click to Display Table of Contents > Teach / Relocate Reference |
|
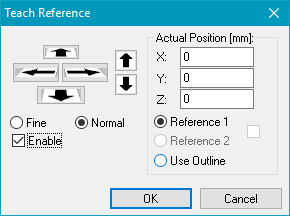
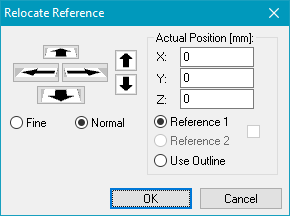
This feature allows you to define a reference position and relocate entities to this position. The reference position can be chosen with the 'Teach Reference' dialog. The translation can be applied to the job with the 'Relocate Reference' dialog. The red pointer (output bit 3) is active while these dialogs are open to show the position on the working field. This feature can be useful when it is difficult to move the workpiece.
|
|
|---|
A typical process with one reference position contains following steps:
1.Open 'Extras → Teach Reference' and choose a reference position.
2.Leave this dialog with 'OK' to store the reference position into the job (it is recommended to save that job afterwards).
3.Place a workpiece below the scan head.
4.Open 'Extras → Relocate Reference' and move the red pointer to the desired place on the target to get the marking result on the right place of the workpiece.
5.Leave this dialog with 'OK' to shift the entities in the View2D.
6.Mark the workpiece.
The teaching will be done only once, steps 3) - 6) need to be repeated for every workpiece.
|
Relocate uses the speed defined in Settings → System → Optic → Min/Max → max Jump Speed |
|---|
For teaching and relocating reference points the related dialogs offer the following functions. These functions can be controlled by the keys described in brackets:
ArrowKeys (cursor up, down, left, right): Move the currently selected reference point in X- and Y-axis. The width of such a movement depends on the stepwidth.
DepthKeys (page up, down): Move the actual reference point in Z-axis (depth coordinate). The width of such a movement depends on the stepwidth.
Fine/Normal (toggle with Shift): Switch between the normal and the fine stepwidth, these values can be configured.
Enable: This checkbox is only available in the teach dialog. It can be used to enable or disable teaching and relocating for a job.
Actual Position: X, Y and Z are absolute coordinates of the currently selected reference points
Reference 1 / 2 (toggle with CTRL): Check 'Settings → System → Extras → Teach Mode, Use two reference points' to enable a second reference position. With two reference positions it is possible to shift and rotate the entities in the View2D.
The one that is currently selected is changed using the cursor keys. If the checkbox between these both radio buttons is selected, the behavior is slightly different. In this case the reference point two is moved relatively to reference point one. This can be used for a raw location of the working piece in a first step to avoid moving wide distances for both reference points separately. If this box is unchecked, both reference points are changed completely independent from each other.
Use Outline: Instead of a single reference point the outline of a job can also be used to select a position. If this option is checked it behaves same as the reference position 1 and can be used to teach or relocate position changes. Because an outline is always a rectangle with its sides parallel to X and Y axis this option can be used only in positioning mode with one reference point.